Using the Digital Compass (EOS 7D Mark II)
18-Sep-2014
8202218300
Solution
Camera orientation information (the direction the camera is facing) can be appended to the image.
The setting procedure is explained below.
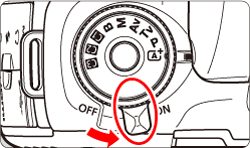
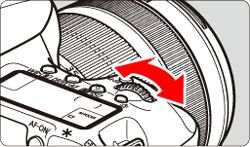
1. Set the camera's power switch to <ON>.
2. Press the <MENU> button to display the menu screen.

3. Press the < > button and select the [
  ] tab.
> button and select the [ ] tab.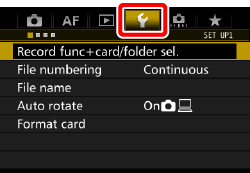
4. Turn the < > dial to select the [
  ] tab.
> dial to select the [ ] tab. 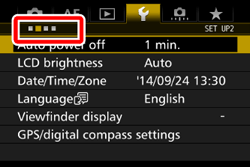
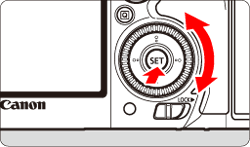
5. Turn the < > dial to select [GPS/digital compass settings], then press <
 >.
>.
> dial to select [GPS/digital compass settings], then press <>.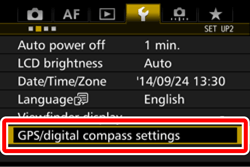
6. Check that [GPS] is set to [Enable].
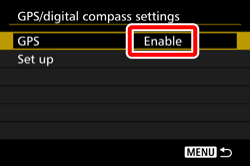
NOTE
If [Enable] is not set, press <>, then select [Enable].
>, then select [Enable].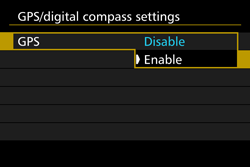
For more information on GPS, please refer to Acquiring GPS Signals (EOS 7D Mark II).
7. Turn the <> dial to select [Set up], then press <>.
> dial to select [Set up], then press <>.
8. Turn the <> dial to select [Digital compass], then press <>.
> dial to select [Digital compass], then press <>.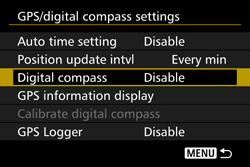
9. Turn the <> dial to select [Enable], then press <>.
> dial to select [Enable], then press <>.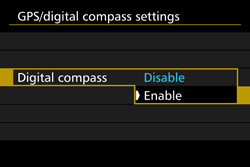
NOTE
If the [Calibrate digital compass] screen appears, perform steps 8 and 9 in the 'Calibrating the digital compass' section below.
The camera’s current orientation can be displayed on the LCD monitor.
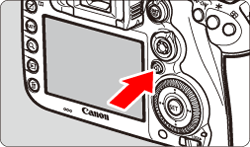
When you press the <INFO.> button to display the digital compass, the direction will be displayed on the bottom of the screen.
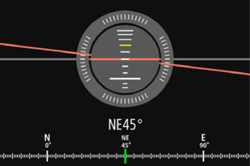
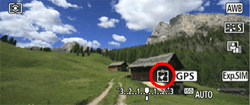
During Live View shooting and movie shooting, you can confirm the direction using the arrow icon at the location circled in this sample screen.
IMPORTANT
- During continuous shooting, if you change the camera direction or tilt the camera up or down, the correct direction information may not be recorded
- The direction information is not recorded to the log file.
While you are using the GPS function, if the [Calibrate digital compass] screen appears or if the direction indicated looks questionable, calibrate the digital compass as follows.
IMPORTANT
- The digital compass should be calibrated at the actual shooting location.
- For safety reasons, detaching the lens from the camera is recommended before you perform the calibration.
1. Press the <MENU> button to display the menu screen.
2. Press the <> button and select the [ ] tab.
> button and select the [ ] tab.
3. Turn the <> dial to select the [ ] tab.
> dial to select the [ ] tab.

4. Turn the <> dial to select [GPS/digital compass settings], then press <>.
> dial to select [GPS/digital compass settings], then press <>.
5. Check that [GPS] is set to [Enable].
6. Turn the <> dial to select [Set up], then press <>.
> dial to select [Set up], then press <>.7. Turn the <> dial to select [Calibrate digital compass], then press <>.
> dial to select [Calibrate digital compass], then press <>.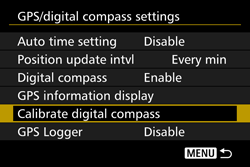
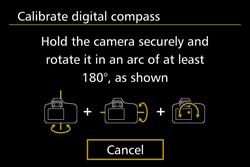
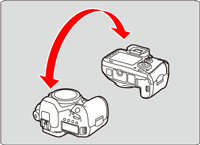
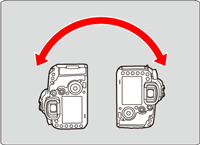
8. Move the camera.
 Swing the camera to the left and right by at least 180°. Swing the camera to the left and right by at least 180°. |
 Tilt the camera up and down by at least 180°. Tilt the camera up and down by at least 180°. |
 Turn the camera by at least 180°. Turn the camera by at least 180°. |
 |
 |
 |
•Steps (
), (), and () can be performed in any order. Keep moving the camera until the calibration is completed.•If the compass is not calibrated after you perform this, turn your body to the right or left and move the camera again.
9. Press <> to exit the calibration.
> to exit the calibration.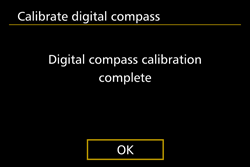
Calibration will be completed normally even if the completion message appears while you are still moving the camera in as shown in (), (), and () of step 8.
), (), and () of step 8.IMPORTANT
Since the digital compass uses geomagnetism for direction sensing, correct directions may not be obtained or calibration may not be possible in the following environments.
- In or near buildings (including office buildings, residences built using reinforced concrete or masonry, and underground shopping malls), vehicles (including cars, trains, planes, and boats), or metal structures such as elevators.
- Near metals (including steel desks and furnishings), permanent magnets (including magnetic jewelry), or home electronics (including televisions, computers, speakers, or mobile phones).
- Near high-voltage lines (including transmission towers), overhead power lines (including those powering trains), or metal facilities (including footbridges and guardrails).
- At high latitudes.