Customizing a Picture Style (EOS REBEL T3i/EOS 600D)
09-Feb-2011
8201006000
Solution
You can customize a Picture Style by adjusting individual parameters like [Sharpness] and [Contrast]. To see the resulting effects, take test shots.
To change Picture Style values, follow the procedures below.
1. Flip out the LCD monitor, then set the power switch to <ON>.
For the details about how to open the LCD monitor, see How to use the vari-angle LCD monitor of the EOS REBEL T3i/EOS 600D.
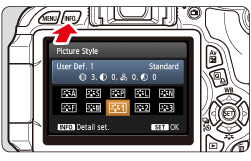
2. When the camera is ready to shoot, press the <  > button to display the [Picture Style] screen.
> button to display the [Picture Style] screen.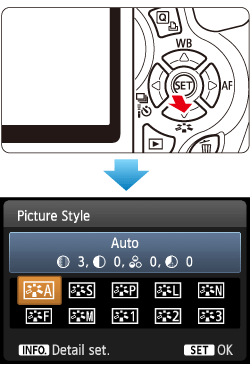
3. Press the <Cross Keys> to select a Picture Style, then press the <INFO.> button.
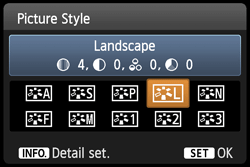
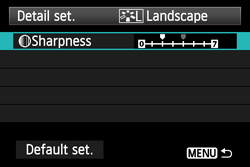
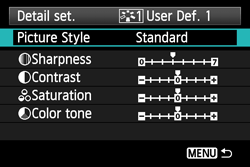
4. Select a parameter such as [Sharpness], then press <SET> button.

5. Press the <Cross Keys> to adjust the parameter as desired, then press the <SET> button.
6. Press the <MENU> button to save the adjusted parameters. The Picture Style selection screen will reappear.
Any parameter settings different from the default will be displayed in blue.

Parameter Settings and Effects
| Parameter | Effect | Details |
| Sharpness | Adjusts the sharpness of the image. | To make it less sharp, set it towards the [0] end. The closer it is to [0],the softer the image will look.To make it sharper, set it towards the [7] end. The closer it is to [7], the sharper the image will look. |
| Contrast | Adjusts the image contrast and the vividness of colors. | To decrease the contrast, set it towards the minus end. The closer it is to [-], the blander the image will look. To increase the contrast, set it towards the plus end. The closer it is to [+], the crisper the image will look. |
| Saturation | The image’s color saturation can be adjusted. | To decrease the color saturation, set it towards the minus end. The closer it is to [-], the more diluted the colors will look. To increase the color saturation, set it towards the plus end. The closer it is to [+], the bolder the colors will look. |
| Color tone | The skin tones can be adjusted. | To make the skin tone redder, set it towards the minus end. The closer it is to [-], the redder the skin tone will look. To make the skin tone less red, set it towards the plus end. The closer it is to [+], the more yellow the skin tone will look. |
NOTE
Monochrome Adjustment
If you select [Monochrome] in Picture Style, it is also possible to set the [Filter effect] and [Toning effect] along with [Sharpness] and [Contrast].
- With a filter effect applied to a monochrome image, you can make white clouds or green trees stand out more.
- By applying a toning effect, you can create a monochrome image in that color.
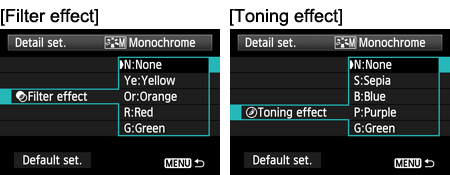
For details about [Filter effect] and [Toning effect], see the instruction manual supplied with your camera.
You can select a base Picture Style such as [Portrait] or [Landscape], adjust its parameters as desired and register it under [User Def. 1], [User Def. 2], or [User Def. 3]. You can create Picture Styles whose parameter settings such as for sharpness and contrast are different. You can also adjust the parameters of a Picture Style which has been registered to the camera with the provided software.
To register a Picture Style, carry out steps 1 to 3 above, and then follow the procedures below.
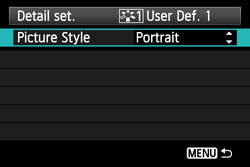
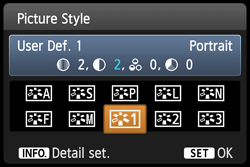
4. Press the <Cross Keys> to select [User Def. *] (the * stands for 1, 2, or 3), and then press the <INFO.> button.
5. With [Picture Style] selected, press <SET> button.
6. Press the <Cross Keys> to select the base Picture Style, then press the <SET> button.
To adjust the parameters of a Picture Style which has been registered to the camera with the provided software, select the Picture Style here.
7. Select a parameter such as [Contrast], then press the <SET> button.
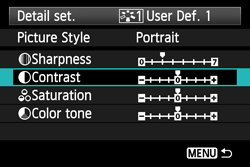
8. Press the <Cross Keys> to adjust the parameter as desired, then press <SET> button.
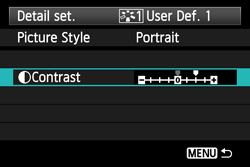
9. Press the <MENU> button to register the new Picture Style. The Picture Style selection screen will then reappear.
- The base Picture Style will beindicated on the right of [User Def. *].
- The name of the Picture Style having any modified settings (different from the default) registered under [User Def. *] will be displayed in blue.
CAUTION
If a Picture Style has already been registered under [User Def. *], changing the base Picture Style in step 6 will nullify the parameter settings of the registered Picture Style.
NOTE
To shoot images with the registered style settings, select [User Def. *] in Picture Style before shooting.