Specifying the Size of the Paper in the Multi-purpose Tray
10-Jan-2012
8200513600
Solution
Specify [MP Tray Paper Size] using the control panel according to the orientation of the loaded paper.
IMPORTANT
Be sure to match the setting in the printer driver
- Match the paper type specified in the Setup menu and that specified in [Output Size] in the printer driver. If they do not match, the message <Set paper below.> appears. In this case, the setting for [MP Tray Paper Size] is changed to that in the printer driver by pressing [
 ] (Online), allowing you to continue printing.
For users who do not use the printer driver
- When you are printing from an operating system on which you cannot use the printer driver (such as MS-DOS and UNIX), match the setting for [Standard Paper Size] and the type of the loaded paper.
Precautions when specifying [Mixed Sizes]
- The printer performs printing without checking the paper settings in the printer driver. Make sure that the paper specified in the printer driver matches that loaded in the multi-purpose tray before using the printer.
- Load paper whose long edges are 215.9 mm or less in portrait orientation (when the short edges of the paper are parallel to the front side of the printer) if you use the UFR II printer driver.
1. Press [  ] (Feeder Selection).
] (Feeder Selection).2. Select [MP Tray Paper Size] using [  ] and [
  ], and then press [OK].
] and [ ], and then press [OK].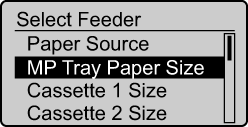
3. Select a paper size using [ ] and [ ], and then press [OK].
] and [ ], and then press [OK].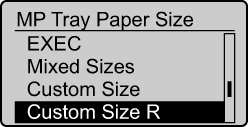
→ The paper size for the multi-purpose tray is specified.